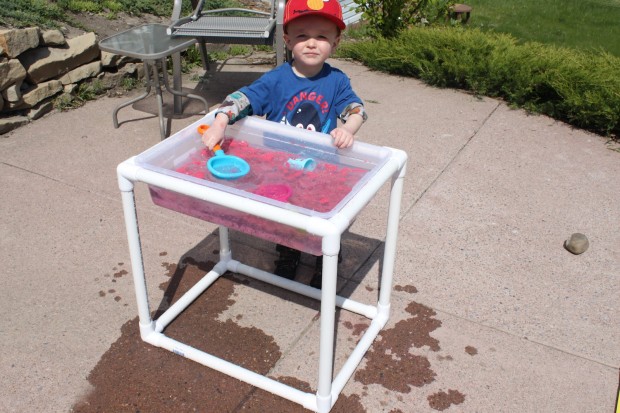
I’d been looking into purchasing a water-table for M, but I really didn’t want to buy a cumbersome, plastic play table that’s difficult to store and would eventually end up in the landfill when M and B have outgrown it; so instead I convinced my awesome husband to make one out of PVC pipe and a couple of clear plastic tubs. I know what you’re thinking, ‘that’s still plastic!’ True, but you can always reuse plastic tubs for storage, and when you put it away for the winter, it’s easy to dismantle and it hardly takes up any space. It’s also a super inexpensive way to have sensory tables in your classroom for your students to experiment with different textures and measurements.
Materials:
- Clear plastic tubs with the same dimensions (I wanted a shallow tub for dry materials such as rice, beans, sand, beads, etc. and a deeper tub for water activities) We used Sterilite containers (56 Qt./53 L and 28 Qt./27 L). You want to choose storage containers that have a uniform lip all the way around in order to distribute the weight proportionally onto the PVC frame to avoid buckling. We bought storage containers from Rona, but you can also find them at Walmart, and on Amazon.com (56 Qt Container and 28 Qt. Container).
- PVC pipe
- 8 three-way connectors (we found ours at an online store called Formufit but you can also find them at Lee Valley Tools)
- A saw for cutting the pipe
- A measuring tape
Directions:
Measure the inside of your tub. We measured the inside rather than the top edges so ensure the tubs would fit snuggly on top of the pipes.
Then cut your pipes according to the above measurements. You will need to cut 4 of each measurement. The use of some kind of vice is recommended so it is easier to cut.
Using the three-way connectors, connect the PVC pipes together to make 2 rectangles (one for the top and one for the bottom)
Next, cut 4 pipes to equal length for the height of your table and connect them to the bottom of the three-way connectors. We measured a height that was suited specifically for M.
M’s already used his sensory table dozens of times as a water-table and for experimenting with rice, beans, Moon Sand, and ice. It’s great for teaching and learning about different measurements and textures, and for keeping messy activities contained.
AND, if you haven’t tried Moon Sand yet, you really should! We bought ours from Toys r us. Under water it’s a clay-like substance that you can mold, but as soon as it is exposed to the air it becomes sand again! It’s very cool!

The PVC connectors came from http://www.formufit.com.
pvc pipes
Our company’s products are PVC pipes, uPVC pipes, UPVC pipe, & Flexible pvc pipes and All type of pipes fitting, Supplier, Wholesalers, exporters & manufacturers in India.
Achei muito legal até porque é fácil de montar só que aqui no Brasil onde comprar este material para brincar na água?
You can find PVC pipe in the plumbing department of a hardware store. We bought our three-way connectors from an online store called http://www.formufit.com. The connectors are used in building greenhouses. Hope that helps!
Thank you so much for posting and sharing this!! I am looking for sensory tables for my kids and they are so expensive. We are totally going to make this! Can you tell me what diameter size are the PVC pipes that you chose? We saw 1″ and 1/2″ pvc pipes available at our Home Depot. We liked the thinner pipes, but we are not sure if the 1/2″ would be strong enough to hold tubs of water, etc. thanks!
Hi Tracy! We used 1″ pvc pipes. Our table is really sturdy, even when the large bin is full of water! It’s important to remember to choose storage containers that have a uniform lip all the way around, in order to distribute the weight proportionally onto the PVC frame, to avoid any buckling :).
hi!can you please tell me which storage container you used exactly and where i can get the exact one?
We used 2 different Sterilite containers (56 Qt./53 L and 28 Qt./27 L). You want to choose storage containers that have a uniform lip all the way around in order to distribute the weight proportionally onto the PVC frame to avoid buckling. We bought our storage containers from Rona, but you can also find them at Walmart, and on Amazon.com (Deep Container- 56 Qt. and shallow container 28 Qt.)
I hope this helps!!